To Create a ProjectWise Storage Device and Repository
Perform these steps on the computer where Storage Service and the ProjectWise Storage Driver are installed.
-
Open
AssetWise System Management Console
().
-
In the Explorer pane, expand .
-
If this is not also the AssetWise Information Integrity Server computer where your community resides, load the community first by right-clicking the Communities node and selecting Add Community. In the Application Server field, enter the name of the computer on which your AssetWise Information Integrity Server is installed. In the Community list, select a community running on the selected server. Click OK, and log in to the community when prompted.
-
Create an external storage device for each
ProjectWise datasource you added to the
community.
- Right-click the Storage node and select Add Device.
-
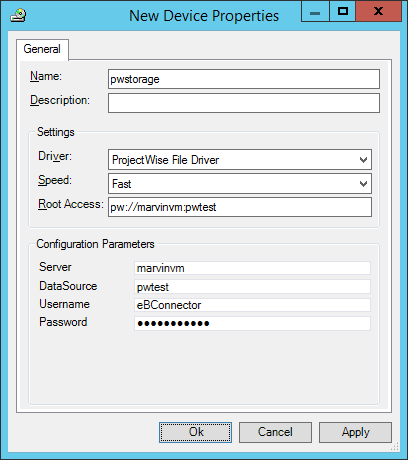
In the
New Device Properties dialog,
set the following:
- Name: Enter a name for the storage device.
- Description: Enter a description for the storage device. If you leave this field blank, the system will automatically make the description the same as the device name.
- Driver: Select ProjectWise File Driver.
- Speed: Select Fast.
- Root Access: Enter pw://server:datasource, where server is the name of the computer on which ProjectWise Integration Server is installed and datasource is the name of the ProjectWise datasource on that server that this storage device relates to.
- Server: Enter the name of the computer on which ProjectWise Gateway Service is installed.
- Datasource: Enter the name of the ProjectWise datasource this storage device relates to. This will be the same datasource name specified in the Root Access field.
- Username: Enter the name of the dedicated user ("eBConnector") you created in the specified ProjectWise datasource
- Password: Enter the password for the specified user.
-
Click
OK.
-
Create a repository under each
ProjectWise storage device.
- In the Explorer pane, expand .
- In the Explorer pane, right-click the new ProjectWise storage device and select Add Repository.
-
In the
New Repository Properties
dialog, set the following:
Name: Enter a name for the repository.
Community: Select the community this repository relates to.
Path: Enter Documents/
"Documents" is the name of the root folder in any ProjectWise datasource, so specifying the root folder signifies that any file in the datasource can go into the repository.
Write Enabled: This is on by default. Leave it on.
Delete Enabled: Make sure this option remains unchecked
Verify Signatures: uncheck this option
Because this repository is created under the ProjectWise storage device which is set to use the ProjectWise File Driver, the External Repository setting is automatically turned on and disabled from changing.
-
Click
OK.
- Select which repository group in the selected community you want this new repository to belong to and click OK.